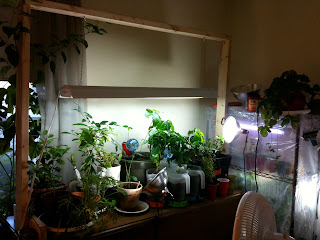
Happy Holidays again and time for one more quick update. The aphids seem to be beaten and the pepper plants promptly responded by putting out a flush of new flowers. This may also be a response to adding a sprinkle of Osmocote 14-14-14 to the top of the soil as the plants looked like they could use a boost. A week later, they’re certainly boosted! I’m fighting some yellow leaves on one miracle fruit plant in my old set up but hopefully it is a heat issue and the small heater I have will keep the temp up a bit more over night. There seems to be a TON of new growth (pictures to follow) on the MF plant in my 55 gallon enclosure under the 150W HPS light. Not sure what did it but all of the sudden, it looks like there are new leave shoots (and possibly flower stalks!?! fingers crossed) coming out every which way. I have some new MF organic fertilizer on its way from Black Rivery Nursery so hopefully that will also help with fruiting. The non-traditional Christmas tree is mostly built and I’m waiting on my lettuce seedlings to get big enough that I can try transplanting them into the system. If the lettuce grows well, I’ll do a full write up. The hardest parts so far have been 1) keeping the water in at the grow sites; and 2) figuring out how to make my old Windows 98 laptop control relays to turn the pump, lights, and Christmas lights on and off. Please don’t try this at home (and don’t forget that GFCIs are your friend, especially when it comes to mixing home hydroponics and home made circuitry). The lettuce likely won’t be ready by the 25th but hopefully I will at least be able to transplant it by then and have it have some decent growth so that the white buckets look green and tree like. I’d forgotten how nice it is to have a lovely plant room with full spectrum lights and tropical plants all around you while outside, it is snowing and freezing!
Wednesday, December 15, 2010
Tuesday, November 30, 2010
Updates
Happy Holidays everyone! All the plants made it through the Thanksgiving holiday break. I haven't kept on the aphids and they seem to have come back after not spraying for a few weeks. I need to just find a few lady bugs to do the job. The miracle fruit plant in the paludarium is starting to push out some new growth and what looks to be a flower bud! I'll take pics later when I know for sure. I've also put a few spinach seedlings in the aquarium aquaponics and will write some posts on that later (assuming they perk up from the transplant). I'm also working on a "Non-traditional Christmas Tree" that will be a hydroponic tower (version 1.0) growing lettuce and spinach. If it works well, I hope to make one that grows fuchsia and passionflower vines. More updates coming soon! :)
Saturday, October 30, 2010
Aphids!
As I've been catching up on work, I haven't had much time to take care of the plants aside from a daily misting and biweekly watering. I noticed, however, the pepper plants that I'd brought in were getting a sort of fuzzy appearance which I at first attributed to a large, secondary flower bloom under their new HPS light. When I thought about it a bit more though, I looked closer (underneath leaves in particular) and noticed that I had an aphid invasion on my hands! After doing some research and a bit of thinking, I came up with my (mostly?) organic fix. In a 32 oz. spray bottle, I mixed 18 oz. of coffee (not piping hot!), 1.5 teaspoons of 70% neem oil and a splash of OMRI listed insecticidal soap spray topped off with RO water. The coffee and soap are certainly organic but the neem oil did not seem to be. Perhaps there is something about the remaining 30% or the manufacturer did not go to the bother of being OMRI listed? I'll have to do more research. Coffee contains caffeine (of course) which the plant produces to protect it from insects. What gives us a nice morning pick me up overwhelms the insect nervous system causing death. On inspection of my coffee plants, I did not find a single aphid on them, possibly due to the plant's defense. I did notice they had made their way to the loquat seedlings which makes me think that the softer, less waxy leaves are more appetizing to these critters. The neem oil is a natural extract of neem tree seeds that deters insects from biting the plant and causing those that do to die from a variety of effects. The soap helps to emulsify the neem oil which is naturally hydrophobic. I sprayed down the infected plants to dripping on both the top and bottom of every leaf and hope that this acts to stop my pest invasion. If not, I will give it a try in one more week. DISCLAIMER: I have not read before about mixing these products and take no responsibility if this harms your plant. This is a test of a broad organic pesticide that works through numerous mechanisms. I will update this post in coming days/weeks to discuss its efficacy both in terms of ridding the plants of aphids as well as any potential side effects. Thanks for reading and feel free to comment on my solution (pun intended)!
Tuesday, October 19, 2010
Paludarium Construction (Update - 3)
It has been a while since I've updated as I was out of town at a conference in LasVegas this past week. Unfortunately, due to some combination of a light failure and the heat coming on in my apartment, I think one of my lime plants may not make it. All of the leaves are dried and have fallen off, save for a few. I'm hoping a fixed light, more water/humidity, redirecting the heating vent, and some TLC will bring the plant back! The paludarium is in the final testing stages right now. I simplified the waterfall and humidifier so it isn't quite as impressive looking as I'd intended but I'm hoping with a little finish work that it will be an amazing little project with things I had on hand (except for a few here and there). If everything continues to go according to plan, I'll likely have a miracle fruit plant acclimating in there in a day or two! I am hoping that I can get the humidity up into at least the 70% range and keep the temperature below 85F. I want to make sure that the foam wall has more chance to stabilize before I completely change the water, install the internal filter pump, and add the substrate to the water section. Then it is time to aquascape, cycle, and get some fishies! Then I'll have to find a new project to tackle. ;-)

 |
| The fogger does a fair bit of splashing as well. When the top has been closed for a bit, it is hard to see the temp/humidity gauge through the fog! |
Wednesday, September 29, 2010
Paludarium Construction (Update - 2)
 Third time seems to be a charm for the silicone holding! There was another small leak as I went to a higher fill rate with the second attempt at siliconing. The seals are holding up to my stress test of a full water load quite well with no leaks for the past hour. I'll run the test a bit longer with the HPS light on and the covers on to see how high the humidity and temps will go with only the standing water. If all goes well, I should be able to start the foam wall tonight. I'm still not sure how to best acclimate the miracle fruit plants to the new light just yet but in absence of some inspiration, I'll probably start with 2 hours of light and gradually increase it to the full 12 hour photoperiod over a few weeks, depending on how the plants respond. This is trickier than with most plants (I think) since the plants respond slowly and I'll have to be extra careful so as not to burn them with a huge change in light exposure.
Monday, September 27, 2010
Paludarium Construction (Update - 1)
I did a quick leak test now that the silicone has dried for 24hrs and found a small leak from the pond section into the land section. The bottom seam held quite well but one of the sides had a pinhole leak. Time to bust the tube back out and give it another go! This is my first time doing this so I'm not sure why I thought it would work perfectly the first time. If anyone has good advice on how to get the best seal the first time, please let me know!
Paludarium Construction (Starting Out)
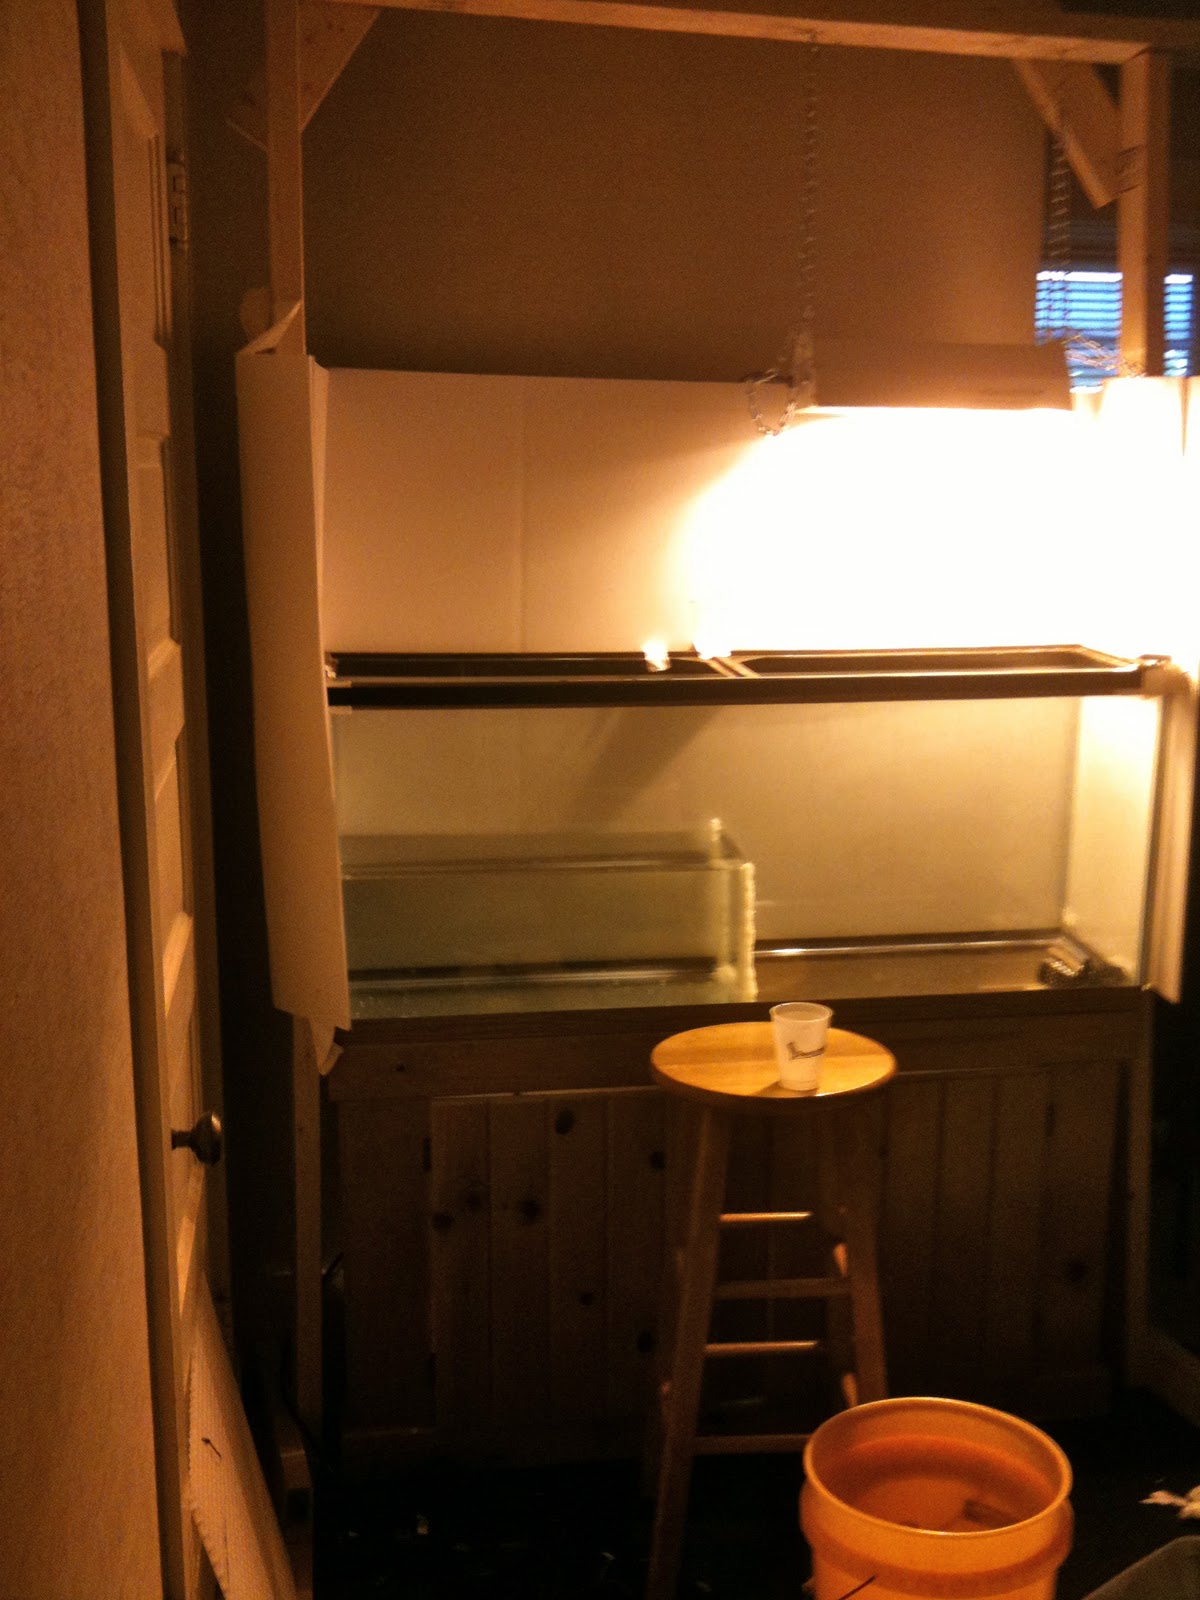
 I’ve been looking for a way to use some of the random items I’ve collected the past few years to help my miracle fruit flower and form fruit. Two such items include a 55 gallon aquarium with stand and 150 watt HPS grow light, both acquired cheaply as used items on craigslist. The problem with combining these two into a mini-greenhouse is that, my usual trick of enclosing a space with plastic film to increase the local humidity would be a major fire hazard. The light gets incredibly hot and it is not worth risking it. Instead, I’m going to attempt a project that I’ve been considering for some time, creating a paludarium-like vivarium. For those not up on their Latin, a plaudarium is like a terrarium except that it mixes both water and land elements. I say “paludarium-like” because I am going to divide the 55 gallon into a water section (containing fish, a waterfall, and drip wall) and a land section (where the miracle fruit and other plants I’m pushing to fruit will reside). In a true paludarium, the two merge with no cirect split, like in a bog. This project will combine two of my favorite hobbies: fish keeping and tropical plant culture.
  The first step was to bring the aquarium and stand up from the basement and find a suitable location. I have a wall that is rather empty and about the perfect size for the set up and so it was an easy choice. Once that was set up, I scrubbed out the tank and began building a light stand. I used a similar principle to my previous light stand but this time, I used nails and reinforced the cross beam to the stand legs with a few pieces of ~1 foot long 2x4 scrap. It’s not the best example of my wood working skill but it is steady and the HPS light hangs quite nicely. The overhang on the right is intentional as I hope to hang my spider plant from this side. In order to keep the light in the enclosure, I used a few spare 3’x4’ white, tri-fold poster boards as light shields. For the two on the front, I attached Velcro strips so that they might be easily taken on and off. One of the front sections covers
  the pond area and one covers the land area. It isn’t a perfect solution to keeping the light in but it will be safer with the grow light and does a fairly decent job. Also, the glowing look of the set up, all closed up, is pretty neat!
 Next, I ventured to home depot and obtained a few pieces of acrylic and some aquarium silicone (and 2 cans of “Great Stuff” foam and a ½” ball valve for later…). I cut the acrylic so that I had 2 9”x12” pieces and a few pieces left for making a lid for the two sections. My aquarium has a cross beam half way through (24”) and so, each “lid” piece fits between these sections. Taking one of the 9”x12” pieces, I siliconed a cross section. This should help hold the water in the pond section and help keep the land section from flooding (crosses fingers). This will be further reinforced later.
 In order to create the waterfall, I’ll be using granite rubble that I have laying around as well as “Great Stuff” foam, sand, epoxy, and egg crate. The egg crate acts as an anchor and helps give form to the whole system. A pump will sit in the back left corner of the pond and pump the water up to the top “waterfall” box. The ball valve in this box will help control the flow from the pump. Also in the  waterfall box will be an ultrasonic fogger that will create a cool mist effect (and also help with keeping the humidity up). My plan is to have the water exit the box by gravity through two different routes. One, along the left side of the tank, will be a waterfall (keeping the water surface agitated) and one the exits the right side of the box that acts as a drip wall with the water flowing out and down several chutes before it drops back into the pond. The bottom will be lined with aquarium gravel that I’d gotten a while ago for free on craigslist. I’m not sure how best to aquascape the tank yet but a few lives plants and central rock would be nice. I estimate the total volume of water in the pond to be just shy of 10 gallons. Using small net cups, I plan to have a few spaces to plant some plant specimens along the waterfall/drip wall. There will also be a small internal filter to help keep the fish healthy and the water clean. Here are some pictures of my progress and stay tuned for future updates! Also, please feel free to leave any comments and feedback below.
 waterfall box will be an ultrasonic fogger that will create a cool mist effect (and also help with keeping the humidity up). My plan is to have the water exit the box by gravity through two different routes. One, along the left side of the tank, will be a waterfall (keeping the water surface agitated) and one the exits the right side of the box that acts as a drip wall with the water flowing out and down several chutes before it drops back into the pond. The bottom will be lined with aquarium gravel that I’d gotten a while ago for free on craigslist. I’m not sure how best to aquascape the tank yet but a few lives plants and central rock would be nice. I estimate the total volume of water in the pond to be just shy of 10 gallons. Using small net cups, I plan to have a few spaces to plant some plant specimens along the waterfall/drip wall. There will also be a small internal filter to help keep the fish healthy and the water clean. Here are some pictures of my progress and stay tuned for future updates! Also, please feel free to leave any comments and feedback below.
Thursday, September 23, 2010
Titan Arum

Last night, I experienced perhaps one of the rarest of indoor tropical plant growing experiences, the blooming of a Titun Arum. After 9 years of growth in Wisconsin, this Sumatran plant burst forth in its gigantic bloom, releasing the stench of rotting carrion. Because of this smell, the plant is also known as the “Corpse Flower”. This smell is given off to attract its native pollinators that dine on the meat of dead animals. As I walked through the greenhouse on the University of Wisconsin campus, I could certainly catch the smell in the air, but was told by one of the greenhouse workers that the evening before was when the real stench occurred. The olfactory event was so pungent that she could smell it in her office on a different floor of the building. The bloom lasts between 24-48 hrs and occurs quite rarely (and I thought waiting on jaboticaba seedlings would be hard!). As an indoor gardener, I feel lucky to have experienced the event but feel no need to have such a smell in my nostrils again for sometime. For more information on the greenhouse, please visit the D.C. Smith Greenhouse website.
Tuesday, September 21, 2010
Self-Watering Container from Recycled Materials

I was recently thinking about ways to decrease the expenses of indoor gardening as well as good ways to make use of products typically thrown away or recycled. One place to save a bit of cash for the penny pinchers among us is to make your own container from recycled products. I’ve been experimenting with several home made container types including my aero-crate, the 5-gallon self-watering container (link opens pdf), and hypertufa pots. Recently, I ran across an instructables article on using old soda bottles to make small, self-watering containers. Following this method, I recycled an old sock with a hole in it (because seriously… how else are you going to reuse such an item?), a 2L soda bottle, and a paper Trader Joe’s grocery bag. The sock acts as the water wick (making it “self-watering”), the soda bottle was cut in half and acts as the container/base, and part of the grocery bag was used between the base and the container to keep light from entering the container. In under half an hour, the container was made, filled with potting mix, and one of my loquat seedlings was planted in it, enjoying a ready supply of moisture in its new home. It has been a few days and the
 wicking really does seem to work rather well! My one issue with this project is that with a 2 liter soda bottle, it only ends up holding a little under a quart of soil (a typical 1 gallon nursery pot holds about 3 quarts). I may try using different bottles (3-liters, milk jugs, anything else that looks interesting) to increase the volume of future iterations. For small seedlings or herbs/flowers, this would be a great little project, especially for those who often forget to water (or over water and kill their plants).
Monday, September 20, 2010
Miracle Fruit

I suspect that of all the plants I have growing, the miracle fruit plants are of the most interest to the general public. For those who are not familiar with this plant, it is a native of West Africa and produces a small red berry that when eaten makes sour foods taste sweet. The berry contains a glycoprotein called “miraculin” that coats the taste buds causing this “miraculous” effect for a short period of time (typically ~30 minutes). The effect is so amazing that some people hold special “flavor tripping” parties in which a variety of foods such as lemons, oranges, vinegars, and beers are sampled under the “influence” of the berry. It should perhaps be noted that this berry has been eaten for hundreds of years and doesn’t have any known ill side effects (though this has not been cleared by the FDA, some suppose due to the sugar/ sweetner lobby). More practical uses of this berry include use for dieting (imagine a slice of lemon cake that tastes just like the real thing but is only 100 calories since it doesn’t contain sugar) as well as for helping patients undergoing chemotherapy to regain their appetite. In the latter case, the fruit is said to help remove the metallic taste that often accompanies food after chemotherapy and helps patients keep on needed weight. More research is needed before this approach has wide spread adoption but if proven true, this would certainly help the plant earn the moniker of miracle!

I currently have 6 healthy, thriving miracle fruit plants, and 1 that I am trying to nurse back to health. It is amazing how the different specimens react to exposure to the same conditions. These plants have all been growing in a wire shelving unit and some clear 3mm thick vinyl sheeting that I had left over from insulating my windows. I covered the entire rack twice and used duct tape to seal it up. A black boot tray sits on the bottom rack in order to catch dripping water and serve as a reservoir of water to keep the humidity up (a key ingredient in keeping these plants growing happily). The plants are in 1 gallon pots on the next rack, just above the boot tray. The growth medium is a 50/50 mix of peat and perlite. The next rack is about 2 and a half feet higher and has my 3 Meyer lemon seedlings and some cherimoya seed starting bags. I water with rainwater with a bit of white vinegar added (they like the acidity) and a bit of super thrive as well. I’ve had several flowers form but as of yet, no fruit, despite my attempts to hand pollinate. It is likely that increasing the intensity / shifting the spectrum of the light may help with this. I have a spare 150W HPS grow lamp (which likely has the proper spectrum/intensity for fruiting) but am worried about placing it inside of my plastic enclosure. I’m still thinking up a good balance for this so expect future posts on this topic.

In addition, I have an unused 55 gallon aquarium that I’m going to start growing a collection of these plants (~20) from seed (For 3:3 Miracle Fruit Seeds - Turn Sour to Sweet - Synsepalum Dulcificum For 15:15 Miracle Fruit Seeds - End Your Dependence on Sugar! - Synsepalum Dulcificum
 For 20:9GreenBox - 20 Miracle Fruit Seeds - End Your Dependence on Sugar!
 For 100 (if you want a Miracle Forest!):9GreenBox - 100 Miracle Fruit Seeds - End Your Dependence on Sugar
 ). I’ve heard great things about Ethan’s Garden over at MiracleTaste.com, a great forum for miracle fruit growers. Many sources say that germination rate for seeds is 24% but with fresh seed, it seems that over 90% germination rate is not uncommon. I’ll be posting pictures of the set up along with updates on the seeds as they germinate and grow. After about 6 months or so, once the roots have had a chance to become established and I know the plants are healthy, I may sell/trade some in order to make room for more seeds as well as the growing plants. I'd like to do some experimenting with different fertilizers, soils, and lighting conditions as well, as this is still somewhat poorly understood, at least to the general community. If growing these plants interests you, I’d encourage you to check out the Miracle Taste forum and do some research before purchasing. These are not typical houseplants but, given the right environment, can thrive, even in Wisconsin.
Sunday, September 19, 2010
Cherimoya
 While reading through posts over at the Tropical Fruits Forum on GardenWeb, I came across a few posts about a fruit known as the cherimoya. I had never heard of this fruit but was rather intrigued when I found out one of my favorite authors, Mark Twain, had referred to it as "the most delicious fruit known to men". As I walked through the isles of my local Whole Foods, hoping to find a passion fruit that I might eat (and then plant some seeds from), I was amazed when I discovered that they had 3 cherimoya fruits in their fruit section! I scooped up one after debating the $5 price tag (yikes!) and biked home, fruit in hand. For those who have not seen them, this is what the fruit I picked up looks like (right). What an odd looking fruit! I later found that I should have let this one age a few more days (till they turn a little bit brown). Once home, I sliced into the fruit to find 43 large black seeds embedded in a creamy, custard-like flesh (picture below). I must say, tasting this fruit was quite the experience. If you happen to find one in your area, I highly recommend giving it a try. It was quite possibly one of the most delicious things I've ever eaten. I saved the seeds and split them into 4 ziplock bags filled with moistened peat moss (10 seeds per bag) and put 3 in peat pellets. Two of the bags went into the upper level of my high humidity vivarium, 1
  went outside, and 1 went on top of the cable converter box (this device gives off a bit of heat that warms the seeds, encouraging them to sprout). After what seemed an eternity (about 5 weeks) I noticed that one of the bags was starting to show signs of life. Two seeds had sprouted in the bag placed on the converter box. A few days later, one of the seeds in the peat pellets sprouted. I quickly planted the sprouts into some pots and hoped for the best. So far, they seem to be doing quite well. I have found that they don't like the higher humidity/temperatures of the vivarium and so, they will live out with the other plants on the plant table. Getting fruit may take some time (though these seem to grow quite quickly) and because of the way the flowers mature, pollination may be complicated. The flowers are not self-fertile and start out
 as female and later, become male. Consequently, I'd need to have both male and female flowers at the same time in order to properly pollinate by hand. I should have years before I have to attack this problem though! :) Having a ready and fresh supply of this wonderful fruit will make the waiting and hard work well worth it. Here (right) is a shot of the most vigorous seedling. Every day, it seems to be a little bit taller and the leaves seem to be a bit bigger which is very exciting to watch. More of the seeds are showing signs of life and so I know a few people who may be getting cherimoya seedlings as gifts in the coming months! This was an easy (and tasty!) project that I would recommend to anyone.
Jaboticaba and Loquats are here!
 I recently purchased 3 jaboticaba and 2 loquat seedlings on eBay from Merseeco Seeds down in Florida. I recieved them on Friday and potted them up in 1 gallon nursery pots, except for 1 loquat which went into my recycled materials self-watering container (post coming soon!). The seedlings look great and seem to be settling into their new home. The jaboticaba is a fruit-bearing tree native to South America. The fruit is known to contain anti-oxidant, anti-inflammatory, and anti-cancer agents (Link). It will take many years (7-15 from what I've read) before the jaboticaba begin to fruit. When they do, the dark purple grape like fruits will grow right on the trunk of the tree. They apparently love water and having their leaves misted so I have them mixed in amongst the coffee trees that get misted regularly. As you can see, these plants are tiny little seedlings but larger, more mature ones look to be available from Hirt's Gardens online (Jaboticaba Fruit Tree Plant - Bonsai or Houseplant
Friday, September 17, 2010
Building a 4' T8 Light Stand
As I worked to clean and organize my plant table, I decided to build a light stand for an inexpensive T8 fluorescent shop light I'd purchased. While it would have been nicer and more efficient to go with a T5 set up, the 2 bulb T8 light cost only $20 with bulbs. To the best of my knowledge, that kind of money wouldn't even buy the ballast for a T5 light! This project was quite simple and I only managed one minor botch.
Parts List:
 And there you have it! A nice set up for keeping your plants happy over Winter (or year round) for under $30, a fraction of the cost of most pre-fab light set ups. The stand also makes it easy to put up a few clamp work lights with full spectrum CFL's for addition lighting. One minor mistake I made was putting the supports on the inside of the leg as opposed to the outside. Putting them outside would have been a bit more structurally stable so I'll know better for my next stand. It seems quite sturdy though and has helped me organize the plant table quite well.
 This should show the hardware a bit better. In the top right corner is the angle iron and you can see the eyelet screw coming out of the 2x4 next to it. This set up is sturdy enough to hold a gallon of fermenting liquid (DIY ginger ale!) that adds a bit of CO2 to the grow table (as it sinks down from above). It may not be a significant increase in CO2 levels but it keeps the jug out of the way!
Parts List:
- 2 untreated 8' 2"x4" boards (~$4)
- 8 2.5" decking screws (had on hand)
- box of 4 90o angle irons with screws ($2, only used 2)
- box of 4 screw end metal loops ($2, only used 2)
- One of the 2x4's was cut into 2 3' leg pieces.
- The other 2x4 was cut into a 5'6" beam piece and 2 ~15" support pieces.
- the 15" support pieces were screwed to the leg pieces perpendicularly at the bottom to form 2 large "T's". I used 2 screws for each attachment.
- The 5'6" beam was placed on top of the "T's" and screwed into it, forming the stand.
- I put the angle irons in the under side of the beam/inside of the legs to help stabilize the whole set up.
- I measured where the support holes were in my T8 shop light and marked approximately where I wanted the light to hang. I drilled a small hole at these spots and hand tightened the screw ended metal loops (I am not sure the proper name) into the holes. Note that you shouldn't drill too big of a hole and that plastic screw anchors might be a good idea... but this seemed pretty solid to me.
- Using the chains and hooks included with the shop light, I hung the light and plugged it in. I use a lamp timer to keep the lights on 14hrs/day. This timer would have added another $6 or so to the cost but I already had one set up and the 3-way socket plug had an empty spot. :) You could manually turn the light on and off but chances are, you'll forget and the plants will like having the regular schedule. You'll need to adjust the height of the light/plants to find an optimal distance.
 And there you have it! A nice set up for keeping your plants happy over Winter (or year round) for under $30, a fraction of the cost of most pre-fab light set ups. The stand also makes it easy to put up a few clamp work lights with full spectrum CFL's for addition lighting. One minor mistake I made was putting the supports on the inside of the leg as opposed to the outside. Putting them outside would have been a bit more structurally stable so I'll know better for my next stand. It seems quite sturdy though and has helped me organize the plant table quite well.
 This should show the hardware a bit better. In the top right corner is the angle iron and you can see the eyelet screw coming out of the 2x4 next to it. This set up is sturdy enough to hold a gallon of fermenting liquid (DIY ginger ale!) that adds a bit of CO2 to the grow table (as it sinks down from above). It may not be a significant increase in CO2 levels but it keeps the jug out of the way!
Introduction
 Hello and thanks for visiting my little piece of the web!
To start, my goals for this blog are 3 fold:
- Be a place to write up the fun DIY projects I concoct/attempt
- Be a log of my plants' growth
- Be a resource to others trying to grow tropicals in temperate climates
A bit about me: I'm a graduate student studying energy conversion and storage in Wisconsin (US Hardiness Zone 5). I live in a rented apartment that has a nice South facing 2nd floor patio and a bit of room for my plants and animals. Because of these things, time, space, and money are always a concern when it comes to my plant
My collection of plants includes:
- 7 Miracle fruit plants (though, 1 may not make it)
- 4 Key lime plants (grown from seed)
- 11 coffee plants
- 3 cherimoya seedlings (with more likely to sprout)
- 4 mangroves (in a salt water aquarium)
- a number of guava seedlings
- ginger
- various outside plants I'm trying to over winter indoors (peppers, lemon grass, citronella, skull cap, basil, and a few houseplants)
- 3 jaboticaba seedlings and 2 loquat seedlings
 Here are my coffee plants, thriving and growing like crazy! On the far left, you can see one of my cherimoya seedlings and on the far right, a loquat in my homemade, recycled self-watering container.
 My mangroves, growing and helping to keep my snowflake moray eel tank clean!
 Miracle fruit madness! These bad boys are nearly breaking out of their enclosure. Hopefully I'll have some fruit soon.
 My hydroponic red savina habanero has officially hit the ceiling.
 Meyer lemon seedlings in the vivarium. I've read that these don't typically grow true to seed due to the plant being grafted to different rootstock. The owner of the tree assured me that he'd planted this on its own roots but only time will tell how exactly these turn out! Also, in the green pot, is a cherimoya seedling. They don't seem to like the high humidity of the vivarium and so, test complete, this little guy will move out with the other seedlings on the table.
More pics to come later!
I'm hoping to expand my collection when I can. Some of the plants I'm hoping to get in the future include:
- Theobroma cacao (chocolate!) -- feel free to let me know if you have a good source for fresh pods!
- Barbados cherry
- a few types of passion fruit vines
- Acai palms
- Neem plants
- pineapple and strawberry guavas
- dwarf pomegranate
- Vanilla orchid
- Cinnamomum zeylanicum (Cinnamon tree)
- I'm always open to other suggestions as well! Go ahead and post a comment for a recomendation.
One further disclaimer, as you probably see some advertisements, I am a participant in the Amazon Services LLC Associates Program, an affiliate advertising program designed to provide a means for sites to earn advertising fees by advertising and linking to amazon.com. My goal isn't to make much money but to earn enough so that I can try out and add reviews of books and other products to this site for the benefit of this blog's readers.
Subscribe to:
Comments (Atom)