As I worked to clean and organize my plant table, I decided to build a light stand for an inexpensive T8 fluorescent shop light I'd purchased. While it would have been nicer and more efficient to go with a T5 set up, the 2 bulb T8 light cost only $20 with bulbs. To the best of my knowledge, that kind of money wouldn't even buy the ballast for a T5 light! This project was quite simple and I only managed one minor botch.
Parts List:
- 2 untreated 8' 2"x4" boards (~$4)
- 8 2.5" decking screws (had on hand)
- box of 4 90o angle irons with screws ($2, only used 2)
- box of 4 screw end metal loops ($2, only used 2)
Directions:
- One of the 2x4's was cut into 2 3' leg pieces.
- The other 2x4 was cut into a 5'6" beam piece and 2 ~15" support pieces.
- the 15" support pieces were screwed to the leg pieces perpendicularly at the bottom to form 2 large "T's". I used 2 screws for each attachment.
- The 5'6" beam was placed on top of the "T's" and screwed into it, forming the stand.
- I put the angle irons in the under side of the beam/inside of the legs to help stabilize the whole set up.
- I measured where the support holes were in my T8 shop light and marked approximately where I wanted the light to hang. I drilled a small hole at these spots and hand tightened the screw ended metal loops (I am not sure the proper name) into the holes. Note that you shouldn't drill too big of a hole and that plastic screw anchors might be a good idea... but this seemed pretty solid to me.
- Using the chains and hooks included with the shop light, I hung the light and plugged it in. I use a lamp timer to keep the lights on 14hrs/day. This timer would have added another $6 or so to the cost but I already had one set up and the 3-way socket plug had an empty spot. :) You could manually turn the light on and off but chances are, you'll forget and the plants will like having the regular schedule. You'll need to adjust the height of the light/plants to find an optimal distance.
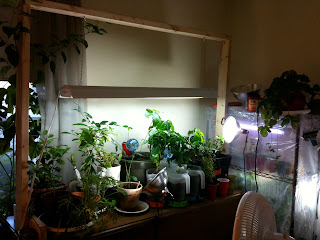
And there you have it! A nice set up for keeping your plants happy over Winter (or year round) for under $30, a fraction of the cost of most pre-fab light set ups. The stand also makes it easy to put up a few clamp work lights with full spectrum CFL's for addition lighting. One minor mistake I made was putting the supports on the inside of the leg as opposed to the outside. Putting them outside would have been a bit more structurally stable so I'll know better for my next stand. It seems quite sturdy though and has helped me organize the plant table quite well.

This should show the hardware a bit better. In the top right corner is the angle iron and you can see the eyelet screw coming out of the 2x4 next to it. This set up is sturdy enough to hold a gallon of fermenting liquid (DIY ginger ale!) that adds a bit of CO
2 to the grow table (as it sinks down from above). It may not be a significant increase in CO
2 levels but it keeps the jug out of the way!


 And there you have it! A nice set up for keeping your plants happy over Winter (or year round) for under $30, a fraction of the cost of most pre-fab light set ups. The stand also makes it easy to put up a few clamp work lights with full spectrum CFL's for addition lighting. One minor mistake I made was putting the supports on the inside of the leg as opposed to the outside. Putting them outside would have been a bit more structurally stable so I'll know better for my next stand. It seems quite sturdy though and has helped me organize the plant table quite well.
 This should show the hardware a bit better. In the top right corner is the angle iron and you can see the eyelet screw coming out of the 2x4 next to it. This set up is sturdy enough to hold a gallon of fermenting liquid (DIY ginger ale!) that adds a bit of CO2 to the grow table (as it sinks down from above). It may not be a significant increase in CO2 levels but it keeps the jug out of the way!